4 Ways to Uninstall Microsoft Edge in 2021
Last Updated: 2021-07-03
“Microsoft Edge” is the default web browser that comes with Windows 10 & it has been evolved over time with many features.
However, many users are already used to other web browsers such as Chrome, Firefox, Opera, etc..). So you might be one of them!
So in this guide, I will tell you HOW TO;
- Uninstall Microsoft Edge from Windows 10 in 4 different ways.
- Prevent Microsoft Edge from launching
- Prevent Microsoft Edge from installing again
Go ahead and follow the method that is most suitable for your Windows 10 version.
How to Uninstall Microsoft Edge from Windows 10 (for Windows version below 1903)
If you are using Windows 10 1903 update. Then it is easy to remove Microsoft Edge from your computer. This is what you need to do:
- Click on start, then click on settings
- Go to apps
- Select Microsoft Edge
- Click on uninstall to remove Microsoft Edge completely
If the uninstall button is greyed out. That means you are using an updated version of Windows 10 and it has disabled the option to remove Microsoft Edge.
Therefore, you will need another method to get rid of Microsoft Edge. Which I have already given below (Lucky you!).
How to Uninstall Microsoft Edge if the Uninstall Button is Greyed Out
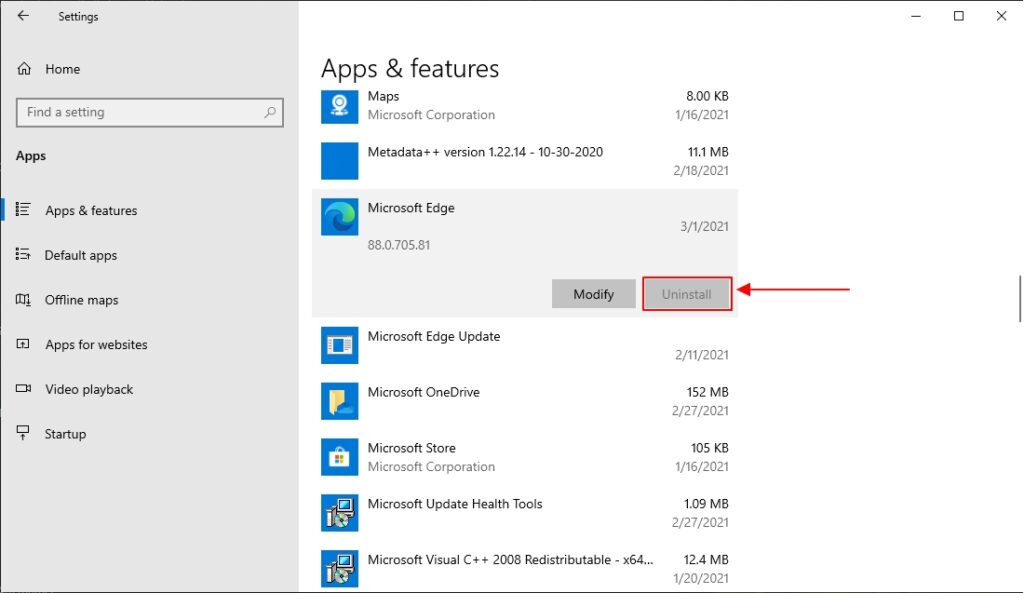
Even though Windows updates have made the uninstall button greyed out for Microsoft Edge, there are other methods to remove the Microsoft Edge web browser completely from your PC.
Method 1— Uninstall Microsoft Edge using Windows Command Prompt
Just by executing 2 commands, you can get rid of Microsoft Edge completely. Here is what you need to do:
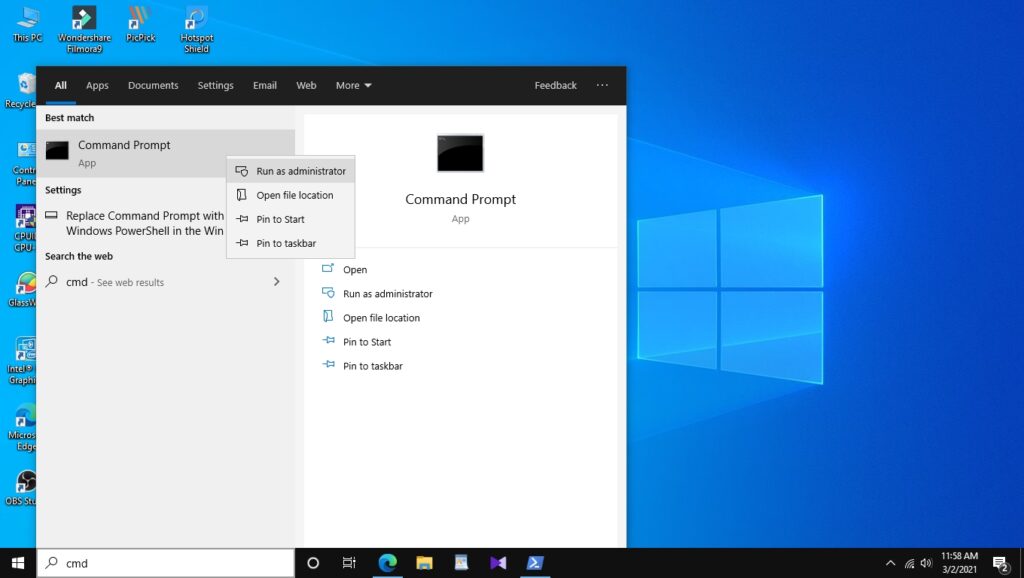
01 – Search for “CMD” in the Search Bar
02 – Right-click on the Command Prompt and click on “Run As Administrator”
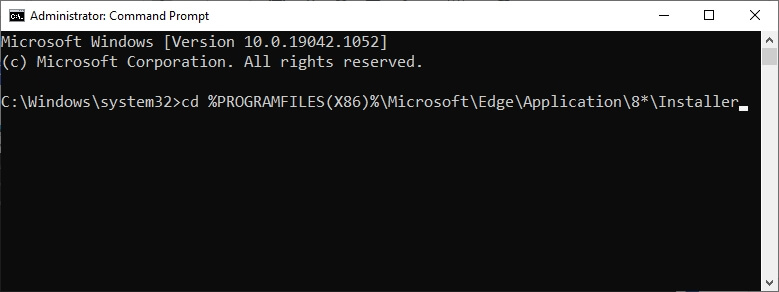
03 – Copy the following command:
Copy “cd %PROGRAMFILES(X86)%\Microsoft\Edge\Application\8*\Installer” and paste it inside the command prompt. Then Press Enter.
Note: If any error appeared after executing this command, replace “8*” with “9*“
04. Copy the following command 2:
Again, copy “setup –uninstall –force-uninstall –system-level” and paste in the CMD. Then press the Enter button.
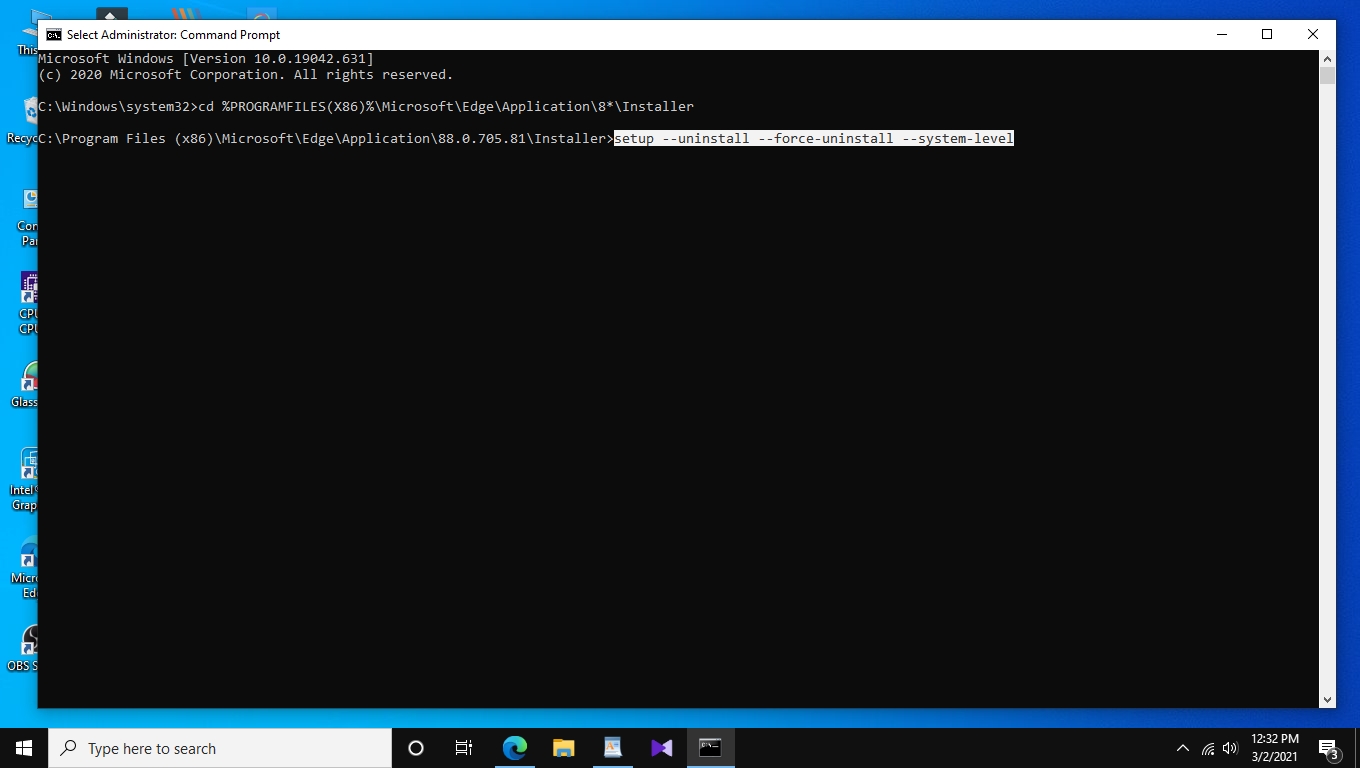
Now you can restart your PC to make sure Microsoft Edge is uninstalled completely.
Method 02 — Uninstall Edge using Windows PowerShell
If method 01 did not work, Don’t worry. You can use Windows PowerShell to uninstall Microsoft Edge completely from your Computer. Here is what you need to do:
01 – Use Windows Search and Open PowerShell as Administrator.
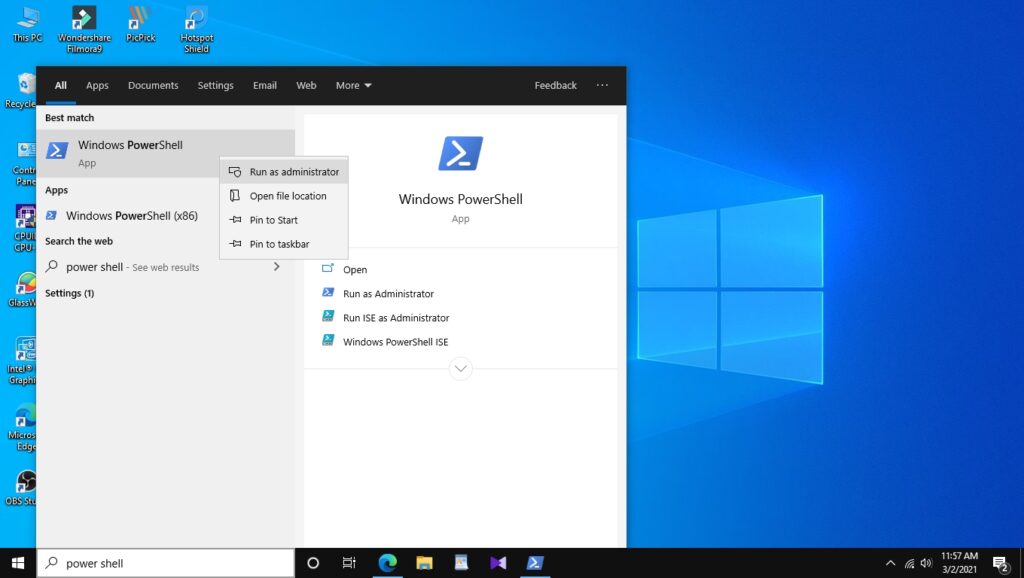
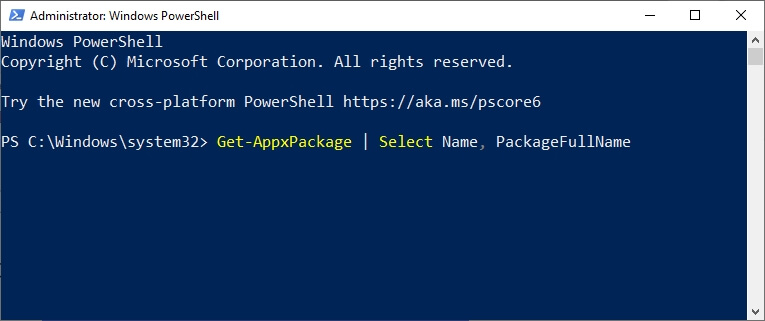
02 – Copy the following command to PowerShell:
Note: Before doing anything inside the PowerShell, you have to maximize the window.
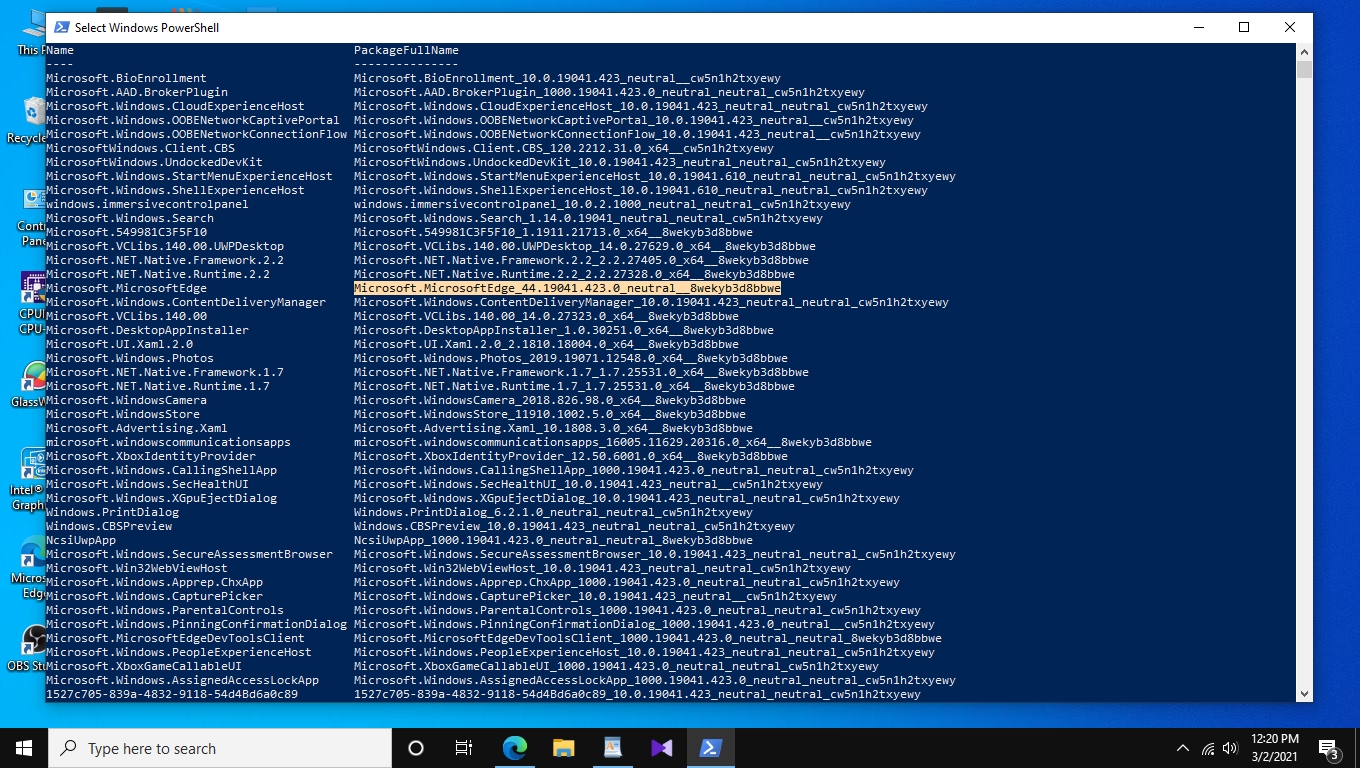
Copy “Get-AppxPackage | Select Name, PackageFullName” and then paste inside the Powershell. Then press Enter.
 The above code opens a list of packages installed on your computer (See the image below).
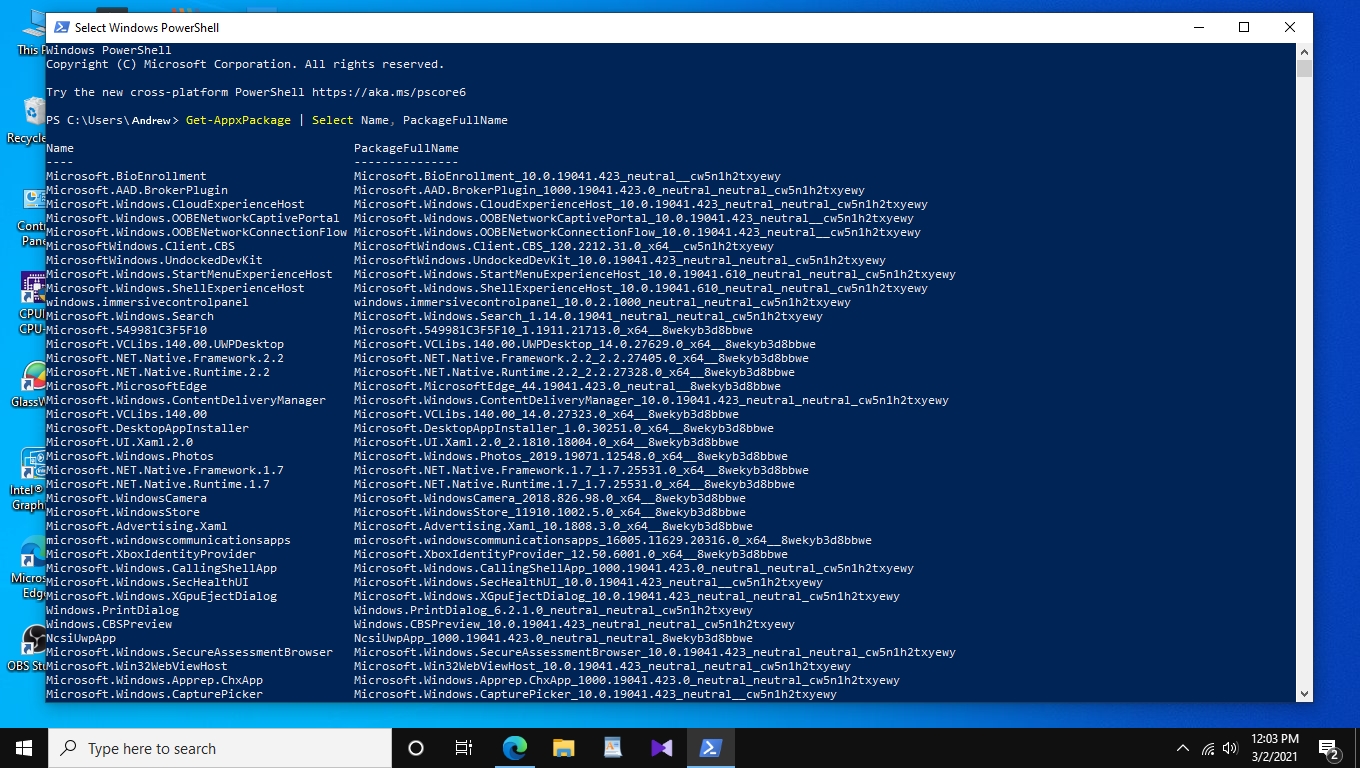
03 – Find “Microsoft.MicrosoftEdge” from the List.
From the left side of the list, find “Microsoft.MicrosoftEdge“. Then copy the full package name from the right side next to it.
Since you have to copy another value in the next step, it will be easier if you open the Notepad and paste the full package name you found.
Note: If it is difficult to find the name “Microsoft.MicrosoftEdge”, then right-click on the top border, click on “edit” and then “find“. Then paste the name in the text box and click on “find next” to find the name easily.
04. Copy the Following Command 2:
Now it is time to remove Microsoft Edge from your computer. You can do this in two ways.
01 – Uninstall Microsoft Edge only from the current user account that you are logged in;
Copy “Get-AppxPackage ValueName | Remove-AppxPackage” and replace the “valueName” with the value (full package name) you copied from the list. Then paste the code inside the PowerShell and press Enter.
02 – Uninstall Microsoft Edge from every user account;
Copy “Get-AppxPackage -allusers ValueName | Remove-AppxPackage“and replace the “valueName” with the value (full package name) you copied from the list. Then paste the code inside the PowerShell and press Enter.
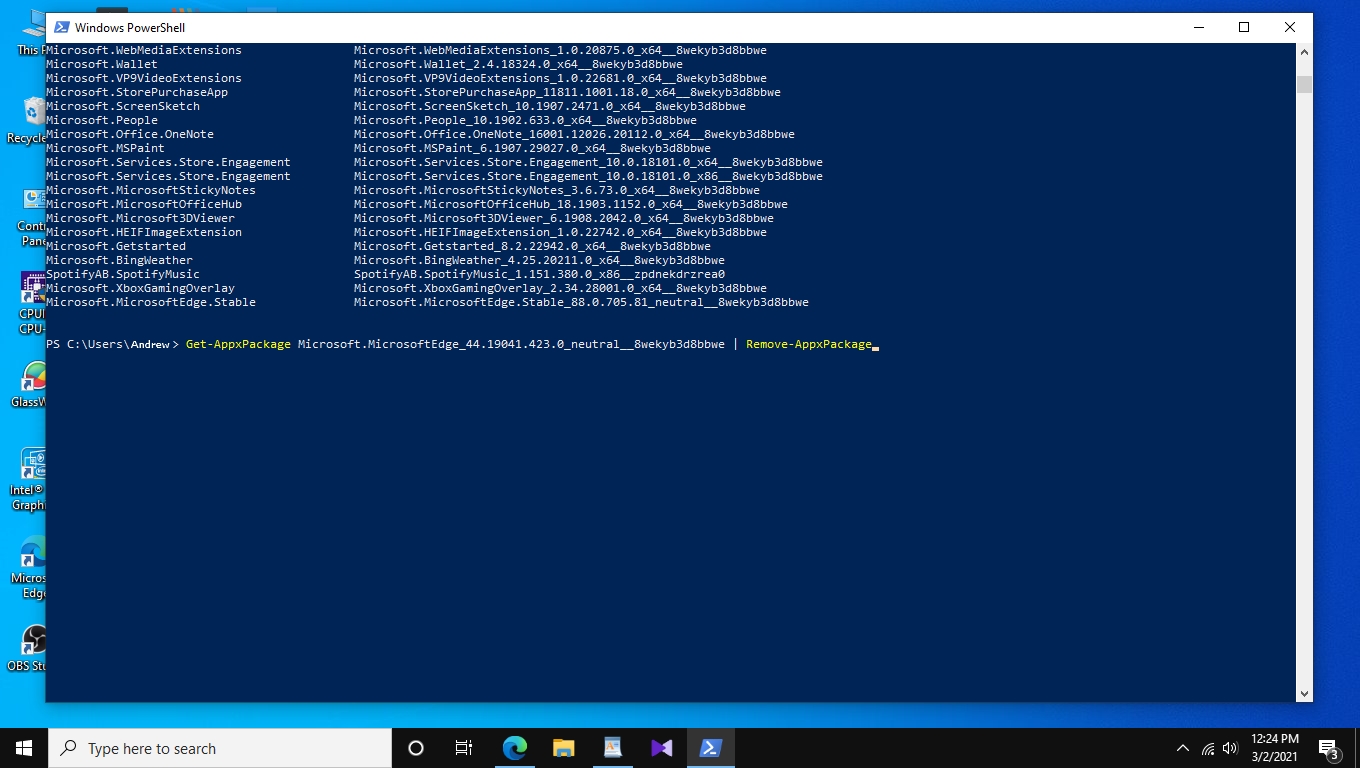
Restart your computer to make sure Microsoft Edge is uninstalled from your PC.
Method 03: Uninstall Microsoft edge using a 3rd party uninstaller
If none of the methods mentioned above worked, you will have to use a 3rd party uninstaller will uninstall Microsoft Edge from your computer.
There are so many uninstaller applications. To make things easier I recommend you use the IObit uninstaller. Its free version is enough to remove Microsoft Edge from your computer.
Here are the steps you have to follow:
- Download and install IObit Uninstaller from here.
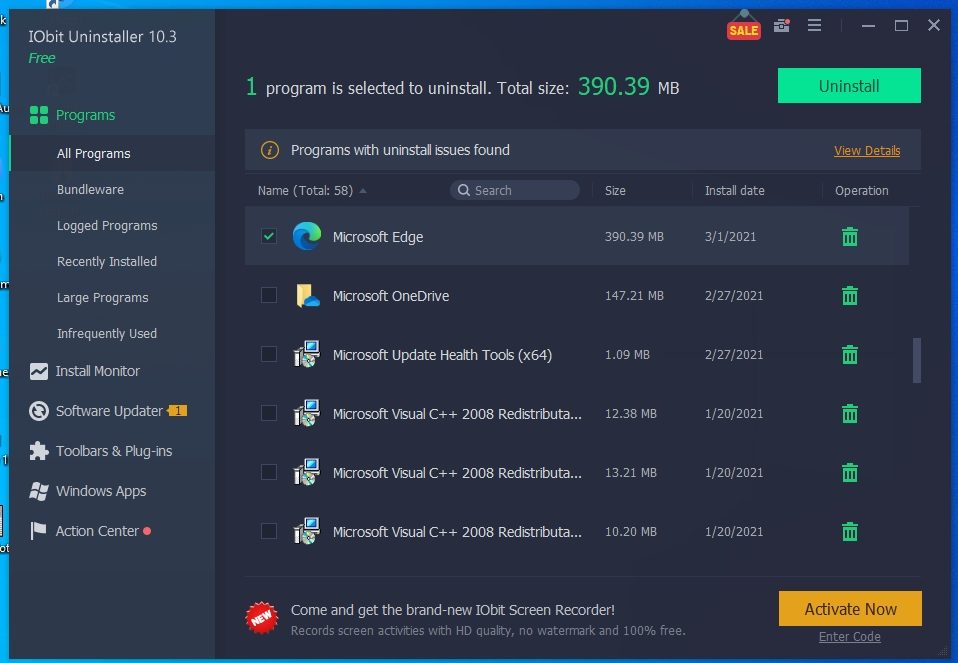
- Open IObit Uninstaller and from the left menu, select programs
- From the category, select All programs
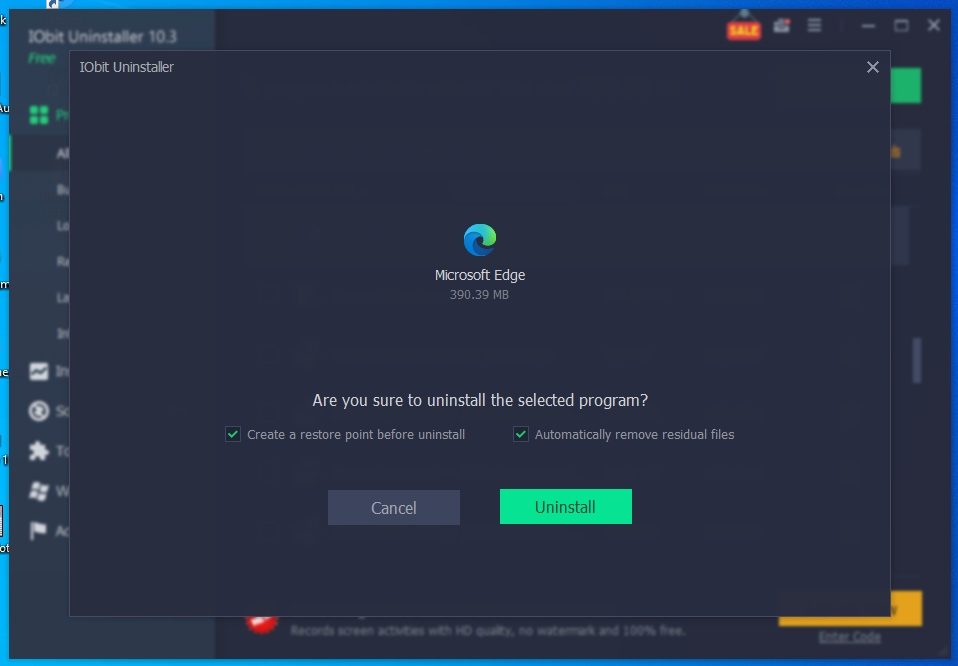
- Select Microsoft Edge and click the uninstall button
All of the steps are shown below using images
How to stop Microsoft Edge from launching
If you don’t mind having Microsoft Edge on your computer. You just can disable Microsoft edge from launching. To do that, you can do one of these methods that are explained below.
Method 1 — Change the default browser app
This is the easiest way to disable Microsoft edge from launching. And the benefit of it is you can change it back whenever you want.
01. In the search bar, type “Default Apps”
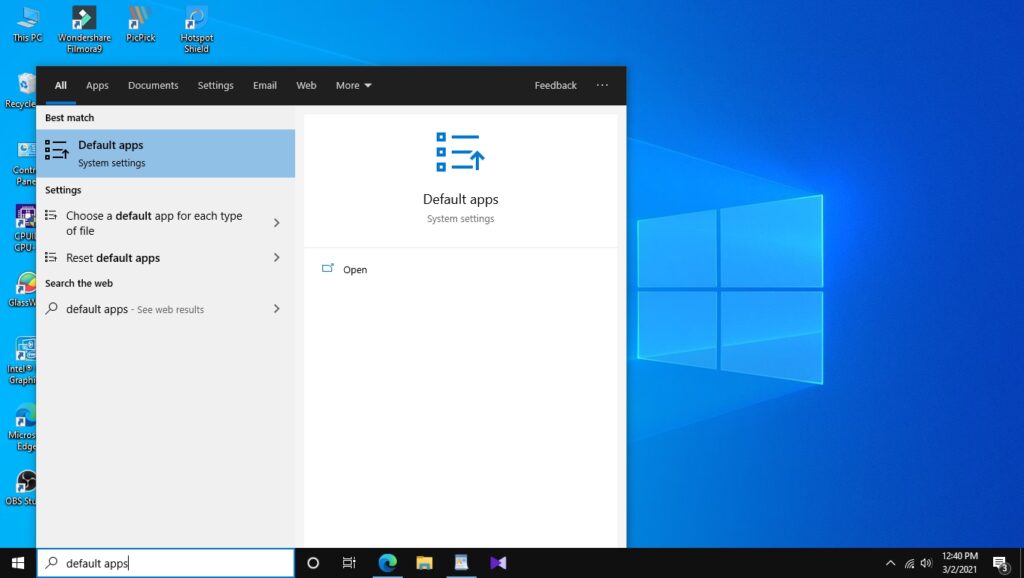
02. Then from the results, open default apps

03. Scroll down and select Web Browser. You will see that currently, Edge is the default browser
04. Click on edge and change it to any other browser that you have installed.
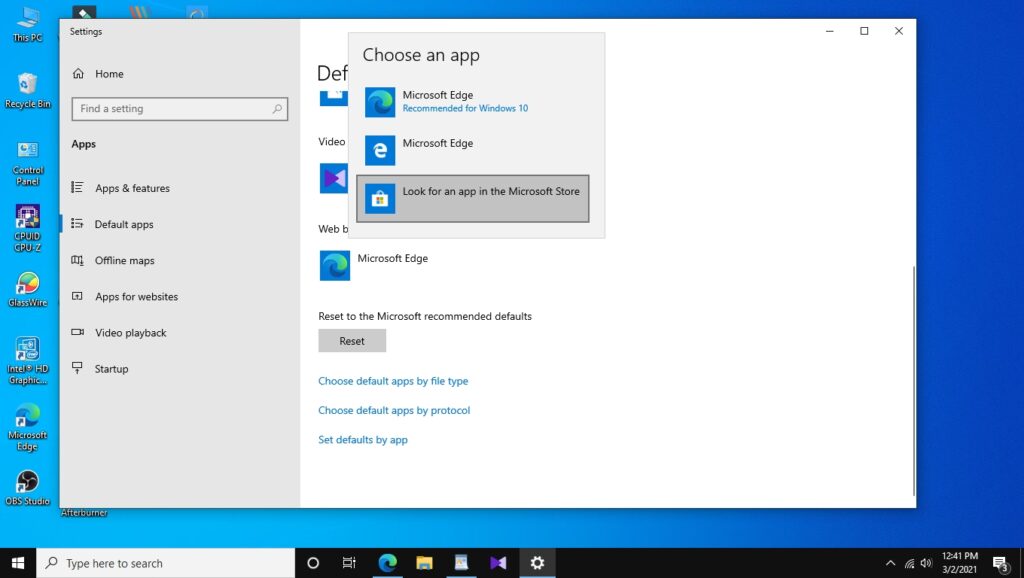
However, Edge can still be opened by some programs and from its installed folder.
So if you want to force it to never launch again. Either you can remove Microsoft Edge from the given methods above or just follow method 2 that is given here.
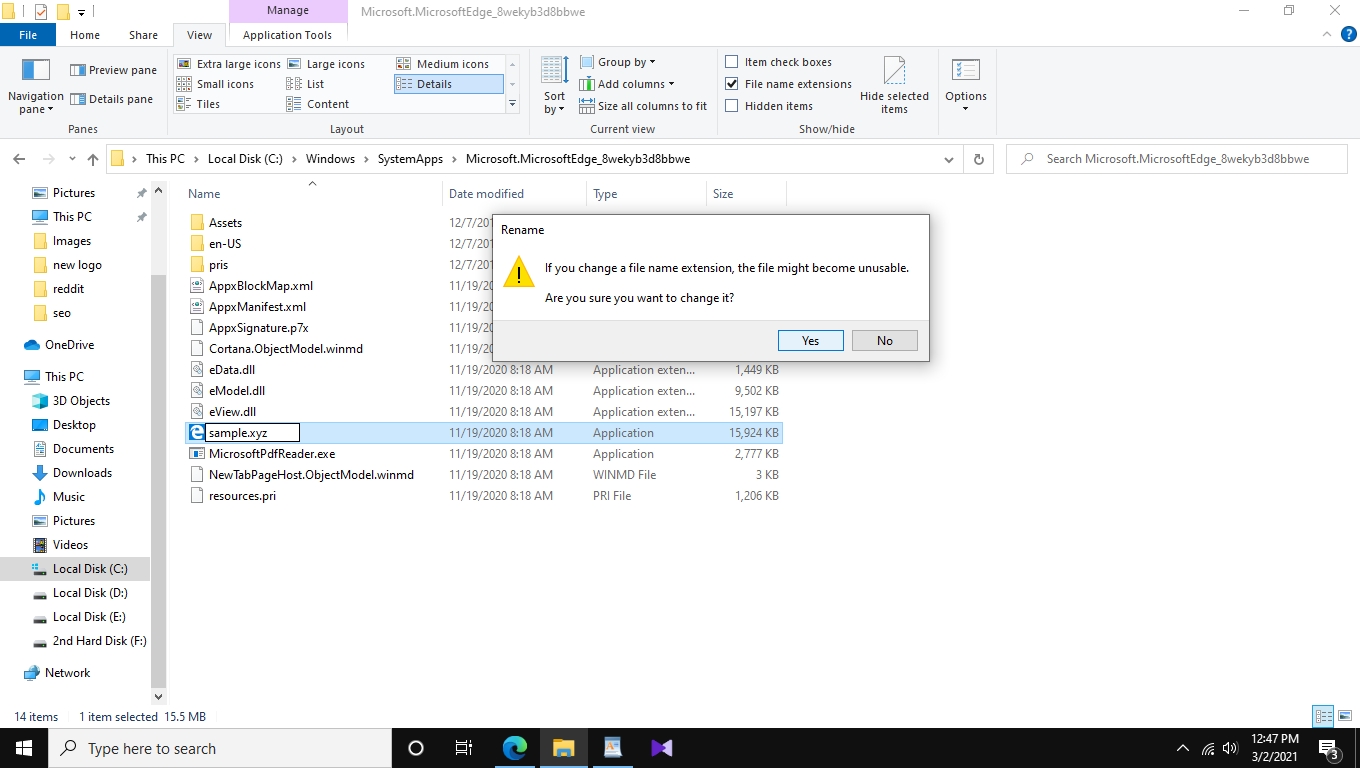
Method 2 — By renaming the folder and .exe file
Renaming Edge’s installation folder and its exe file, windows won’t find it again so it will disable Microsoft edge from launching.
01. Go to C drive and go to windows > SystemApps(or WindowsApps)
02. Scroll down and find the folder starts with the name
“Microsoft.MicrosoftEdge”
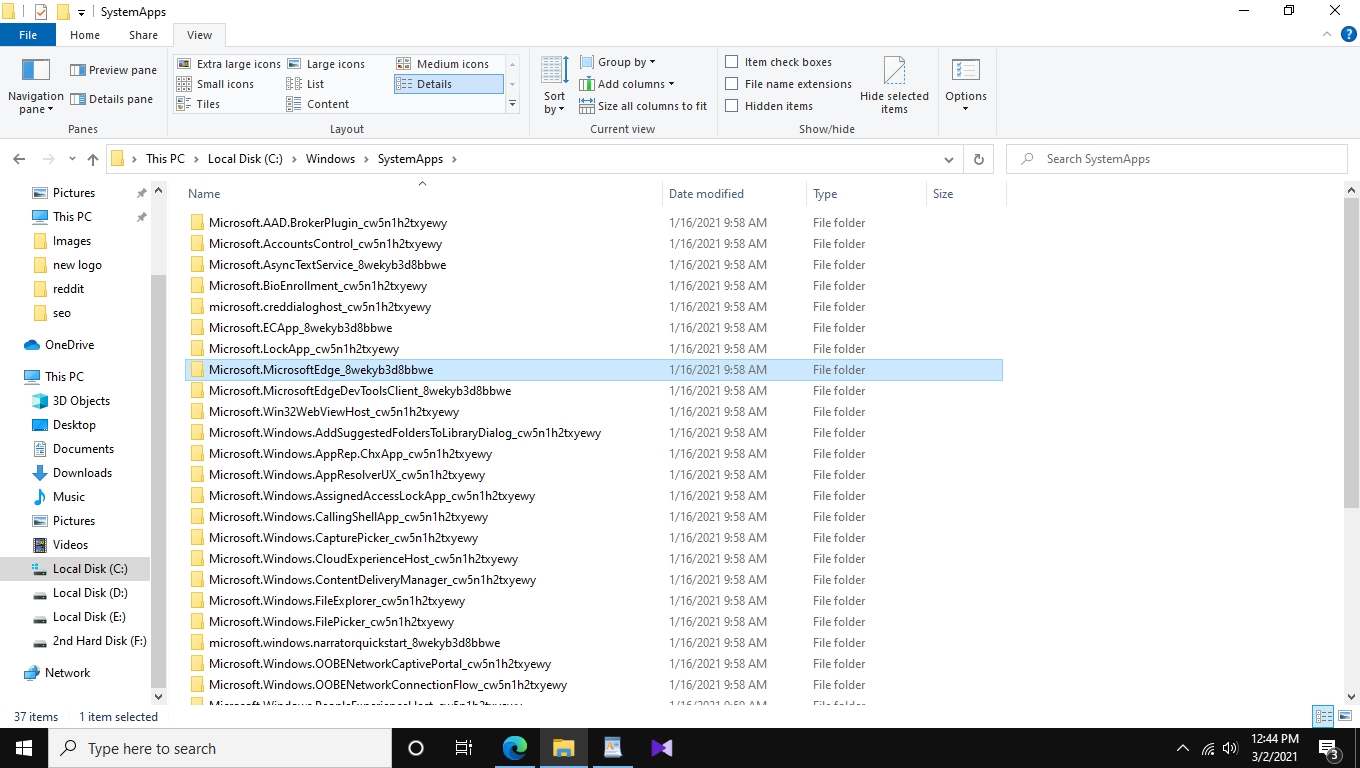
03. Right-click on it and click on rename.
04. Then add any letter/symbol next to its name
(EX: Microsoft.MicrosoftEdge_8wekyb3d8bbwe#)
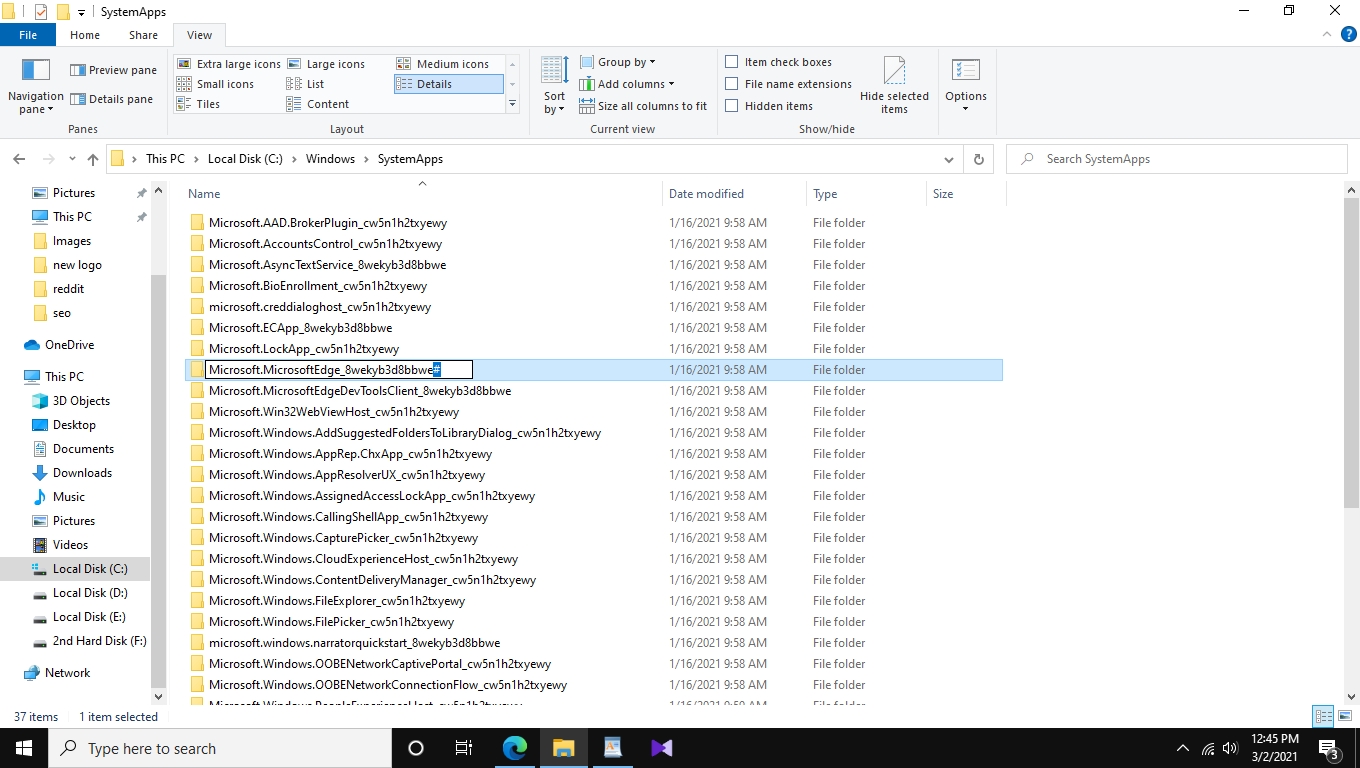
05. Also you can rename MicrosoftEdge.exe and MicrosoftPdfReader.exe files if you want (but only renaming its folder will be enough)
How to Prevent Microsoft Edge from Installing Again
Once you have removed the Microsoft Edge browser, I can’t say that it won’t install again
Even though you disabled Microsoft edge, I cannot guarantee that. Because whenever you run Windows update, there is a chance that it will be automatically installed again on your computer.
So you have to disable windows updates to prevent that from happening. Isn’t that so? No! We never recommend you to disable windows updates. Because there is a better way to do that
How to block Microsoft Edge from Windows update
To disable Microsoft edge from installing again through windows update. You can use the Microsoft blocker toolkit.
Follow the instructions to disable Microsoft edge from installing again on your Windows 10.
01. Download Microsoft blocker toolkit from Microsoft website
02. Open and extract files to a folder.
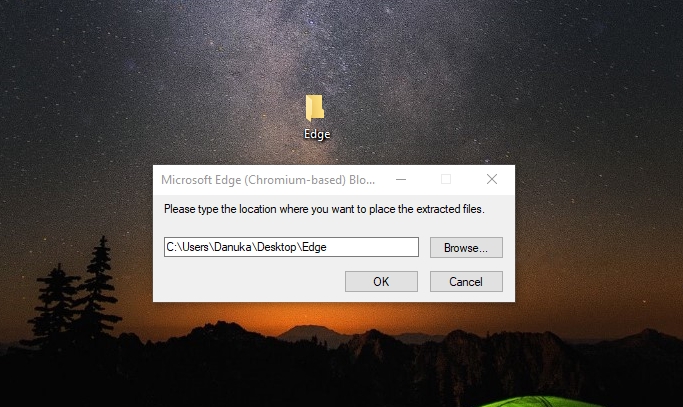
03. Once you extracted all the files open the command prompt (Run as administrator)
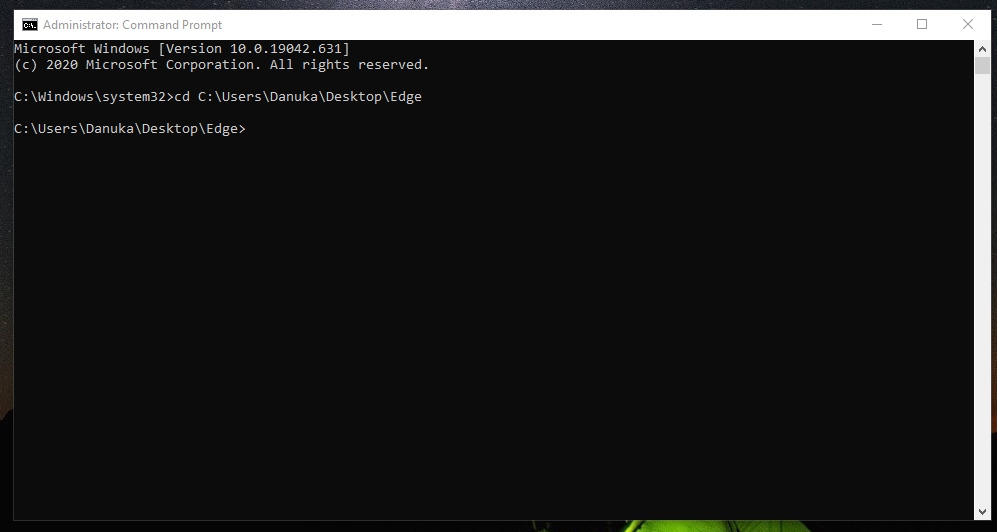
04. Copy the command below:
“cd c:\file_path“ and paste it in CMD. Then rename “file path” with your extracted folder path
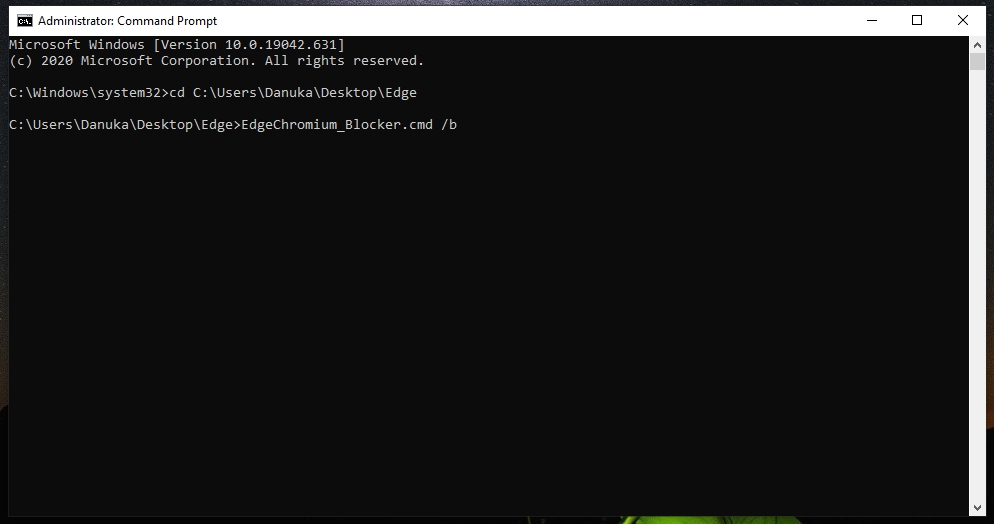
05. Copy and paste this piece of command to block Edge from installing again.
“EdgeChromium_Blocker.cmd /b“
That’s it. I think now your problem is solved.
Don’t forget to Like and share with your friends. And Leave a comment to support us!
Related topics:
How to change taskbar color in windows 10